As CVT transmissions are appearing in our shops with increasing frequency, there still seems to be a degree of hesitance for some shops to take on these jobs. Even if shops do not want to build these units in-house, there are reliable sources for remanufactured units out there that enable them to capture profit on R&R rather than sending a customer down the road to a competitor. Shops must be able to diagnose the correct operation of the unit, and in a nutshell, it is a relatively straightforward process. There are only four solenoids, and two of them are for TCC operation. There are two pressure sensors that are really easy to verify operation (at least after a gauge or pressure transducer is connected), and we will get into those details later in the article. Lastly, there is a stepper motor in place to control the variable ratios of the transmission. The stepper motor is what is new to us transmission guys, and while some stepper motors can get extremely complicated, the ones used in the Nissan/Chrysler applications are not.
The RE0F10A/JF011E transmission utilizes a two-phase unipolar stepper, each with two windings and a center tap for each phase. This type of arrangement allows the magnetic pole to be reversed without reversing the direction of current; the center tap is "common" and only requires a single transistor for each winding. The motor is driven in what is called a "full step drive" which means two phases are always on at one time, which results in a higher torque output than the other methods that will have finer control, or resolution. The stepper motor is very reliable by design and could be compared to a brushless DC motor. For our purposes, it is mainly the windings and the bearings that we have to worry about as they must operate within a hostile work environment. The following photos are the stepper motor partially taken apart:
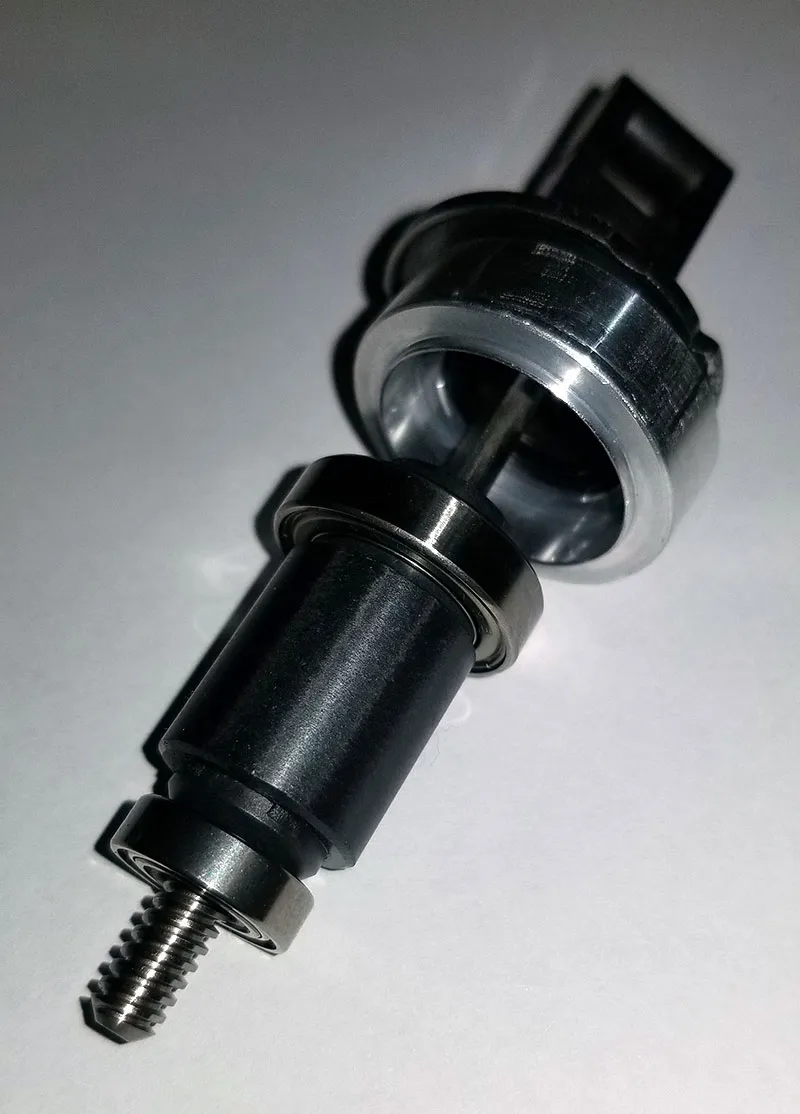
Figure 1
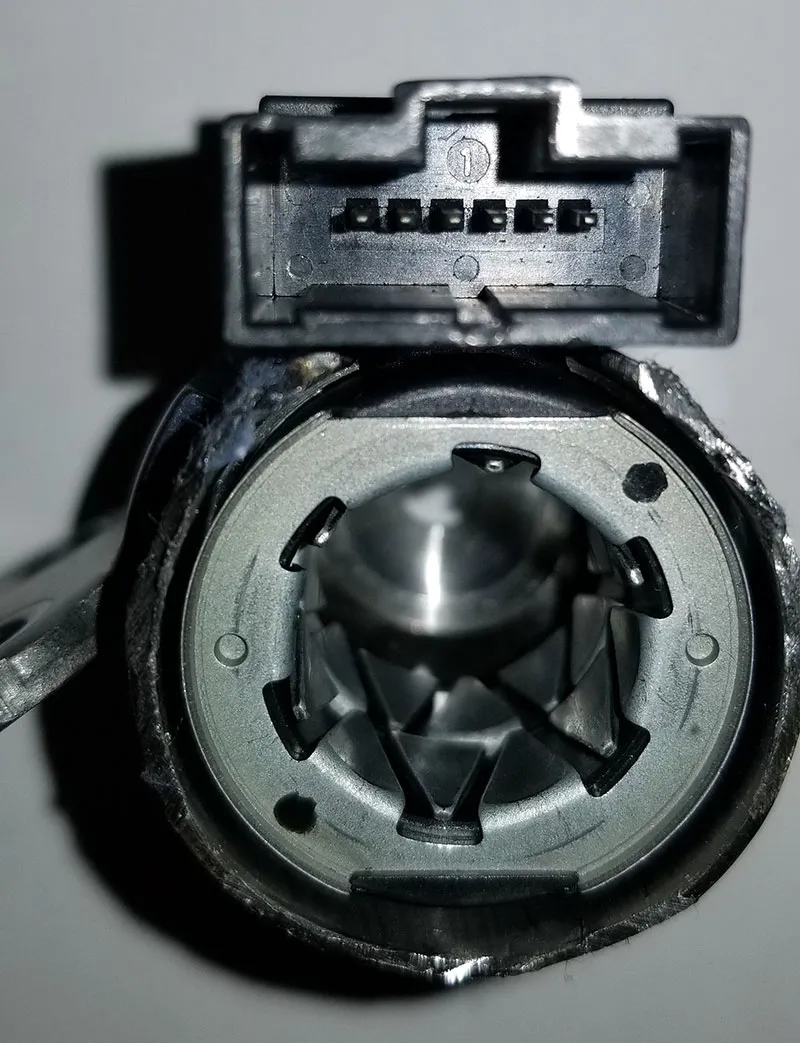
Figure 2
There are a few ways to test a stepper motor on the bench. A simple resistance check is one of them, and since I have never seen the specs posted, we will cover that first. Refer to (figure 3). Measuring between each leg (phase) should produce a result of 15 Ω. If you connect a DMM between pins 1 and 2 you will get 15 Ω (figure 4), and connecting between 1 and 3 and you will see 30 Ω. Pins 2 and 5 are the grounds so it doesn't really matter which side you start from; the second pin in from either side will be a ground. This is just a quick test to make sure you do not have an open or short, and I would always try to run the motor in and out for more of a "live" test (be sure to use some type of controller; do not just apply a direct 12v to these circuits as these windings use a very fine wire and can heat up quickly).
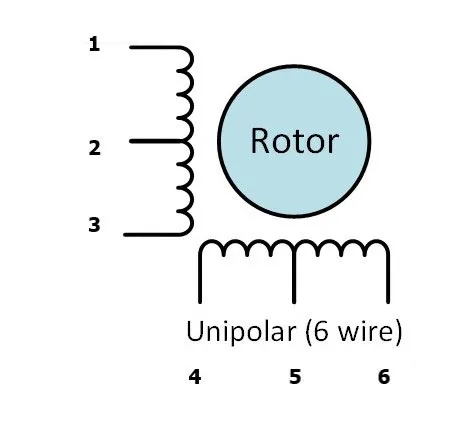
Figure 3
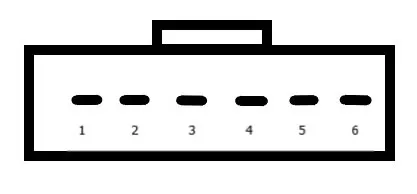
Figure 4
There are stepper motor controllers that can be purchased that are used only for running the motor in and out, but another option is to build your own if you really like to tinker with stuff. I am not going to go into all the specifics here but there are kits you can buy that utilize either Arduino or Raspberry Pi boards, and a simple web search will turn out tons of results including videos that will show you how to build it. For this application you need a six-wire unipolar stepper motor controller.
Now we'll move on to some cool screenshots from the scope. The top section on each of these screen captures is the main view which has the entire recording in it, and the bottom section is the zoom view which will only show a focused section from the main view. This scope has math functions built-in that allows for measuring the results from any point, either between cursors for a Duty % or Hz reading, or at a specific point for a voltage reading. We are using ten channels, four for the solenoids, four for the stepper motor, and the last two are Pico pressure transducers connected to the primary and secondary pulley pressures. When Certified Transmission prepared for remanufacturing these units, we had to make a reliable, repeatable, dynometer test and that was the driving force for us to gather this information.
The following capture is a 0-70 mph run that was a total of 46 seconds, and you can see how the stepper motor is more active at the start and gradually slows down as the ratio stabilizes. The zoom window only contains two seconds of operation.
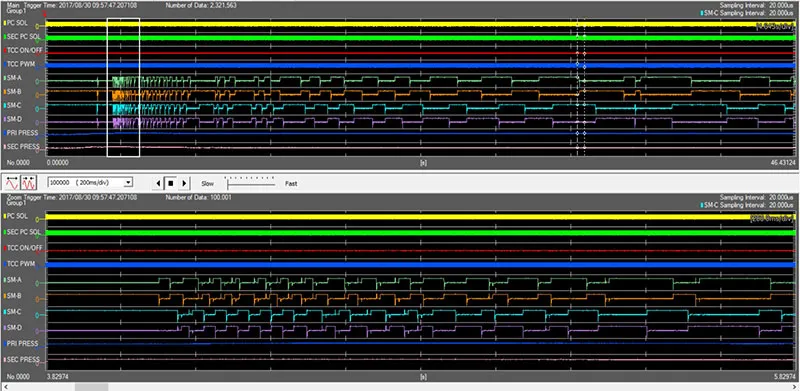
Figure 5
The next capture is close to the same recording time as above, but we used the manual shift option where you can see clearly defined ratio changes for each gear selected. The zoom window is only one second of the main window, so the completed ratio change from the theoretical 1-2 gear shift took just a little over .7 seconds to complete.
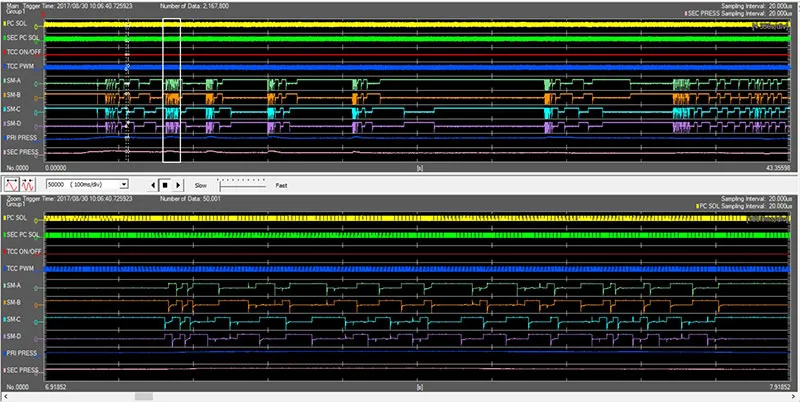
Figure 6
Displaying Park, Drive, Drive Stall, Neutral in this capture shows TCC on/off solenoid responding to the gear selector changes, and since the vehicle never moved there is no operation of the stepper motor control. This is where we obtained the pressure specs for the Pri/Sec Pulley pressure. At stall the PC solenoid is running at 15% +duty and the secondary PC solenoid is basically shut off. These readings result in 248psi at the primary pulley, and 410psi at the secondary pulley. At Idle the PC solenoid is running at 45%+ and secondary PC is at 36%+. Corresponding pressures are primary 138psi and secondary 197psi. All three of the PWM solenoids run at 800Hz.
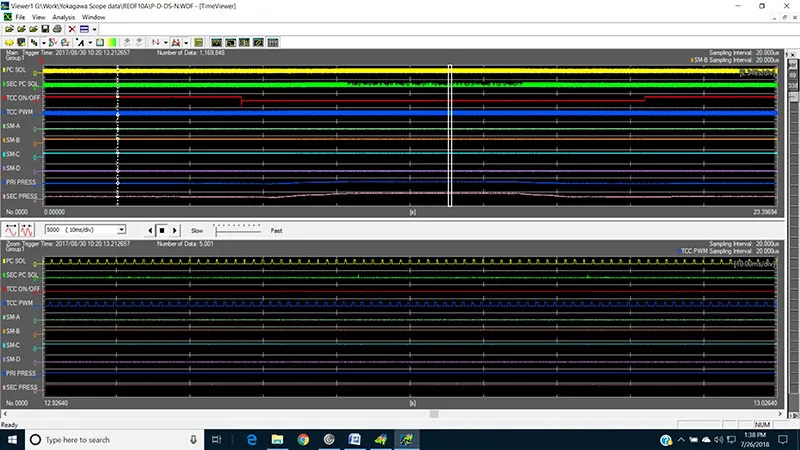
Figure 7
A word about pressure testing: BE CAREFUL! Although some of the pressure taps on this unit can be tested with the same equipment that you have used for years, there are others that you can't. I haven't put this unit into failsafe mode to see what would happen, but just normal operation of the Ford CFT30 transmission (as an example) can run close to 900psi of pressure. If you own a Snap-On Verus or the newer Zeus scan tool, they offer a 0-5000psi transducer that is actually reasonably priced and you can look at the pressure on the scope and enables recording pressure events. Make sure you have hoses that can handle these high pressures as 800psi of hot CVT fluid is nothing to mess around with. We have always gone by the 200% rule, so all of our hoses used for CVT testing have a minimum 2000psi burst rating for safety.
These transmissions are getting common in the field. Adequate training, understanding, equipment, and software are the basic requirements for a modern shop to have in order to survive in the latest wave of technology. While these transmissions are certainly more complicated, working on them doesn't have to be.
 Certified Transmission
